
Friendship bracelets are typically made of thread and given to a friend as a token of friendship. However, you can easily make string bracelets to add to your own collection of accessories, or sell them for a little extra money. If you want to know how to make a thread bracelet, you just have to follow these steps.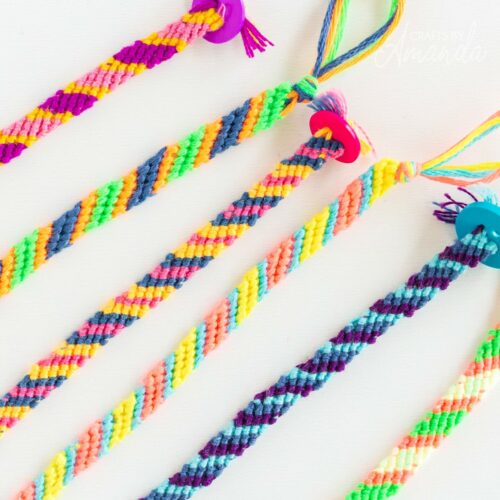
Instructions for making string bracelets
- Choose several embroidery threads of different colors. Choose as many strands of yarn as you like, but you must use three or more, as well as the number of colors that would look good in a pattern. If you only use one color of thread, you won’t be able to create a pattern. 4-6 strands will make a narrow bracelet, and 8-10 strands will make a thicker one. The more threads you choose, the larger the bracelet will be.
- Measure and cut the first string. Measure a length of thread slightly longer than the distance from your fingertip to your shoulder, then cut. This will be enough to make the pattern you want and wrap the bracelet around your wrist. It is better to cut the longest rope that does not cut.
- Use the cutting chain to measure and cut the remaining threads. Just push the cutting string up to the remaining strands and cut them to the same length as this strand.
- Tie the threads in a knot and pin to a stable surface. You can attach the wristband to your pants, to a pillow, or to another stable fabric surface that won’t get damaged. You can also get creative and tie a piece of cloth to her big toe to hold the bracelet together, but possibly the best way to keep the thread stable is to fix it to a solid surface.
- Separate the threads by one end. Before starting the knot system that will create the bracelet pattern, lay out the threads so that the colors are in the order you want them to make the striped patterns on the bracelet clear. To make the knotted end of the bracelet less bulky, try not to cross the threads over each other too much.
- Make a few short braids in the bracelet before you start making the pattern (optional). You can start the bracelet by creating three separate strands (you can group them in groups of two or three) and then braid a three-strand bracelet or hair braid.
- First Knot on the far left around the first thread immediately following the thread on the right. You need to tie the “cote” knot to do this correctly. First, move the first thread you will be using over the front of the second, leaving a loop on the left side. Next, pull the first thread into the second, and thread the thread through the loop you’ve created and pull it up, until a knot moves up to the top of the second thread.
Hold the thread you are tying around firmly to make sure the knot is tight and positioned correctly. - Knot the thread that was on the far left around the others from left to right. Now, repeat making the “half hitch” knot with the next thread you started around each of the other remaining ones from left to right. Tie two in the same knot on each thread before moving on. When you’re done, the thread you started with on the far left will move all the way to the far right.
- Continue knotting the left threads around the other threads from left to right. Each thread will end on the right when you’re done, and you’ll start with a new color of thread each time, unless you’ve placed two threads of the same color together.
- Continue knotting the thread until the bracelet is long enough for your wrist. To make sure it fits you, try it on your wrist. There should be enough extra space so that you, or the person you want to give the bracelet to, can fit about 2 fingers on the side of their wrist.
- Braid the ends of the bracelet (optional). If you want you can make a small braid at the end of your bracelet joining threads as you did at the beginning. You can join groups of two or three threads so that they are even and make a braid to finish.
- Add charms or beads to the end of the bracelet (optional). To give your string bracelet a bit more personality, you can put some small decorative items on the strands and then tie them in a knot to secure them.
- Tie the end of the bracelet in a knot. Make sure the knot doesn’t take up the space you need to be able to tie it around your wrist.
- Trim the extra thread. If you still have a lot of thread, you can cut the excess thread.
- Tie the bracelet. Now that you’ve knotted both ends of the bracelet, simply tie off the bracelet chains. If you have a friend who can wear it, you can tie it more to the necessary size, if, on the contrary, you want to give it as a gift, you can see if it is too big or too small for your friend.
- Put on the string bracelet. Move your friendship by giving bracelets to all your friends.
What do you need to make thread bracelets?
Embroidery thread.
Pair of scissors.
Safety pins, clipboard or tape.
Charms (optional).